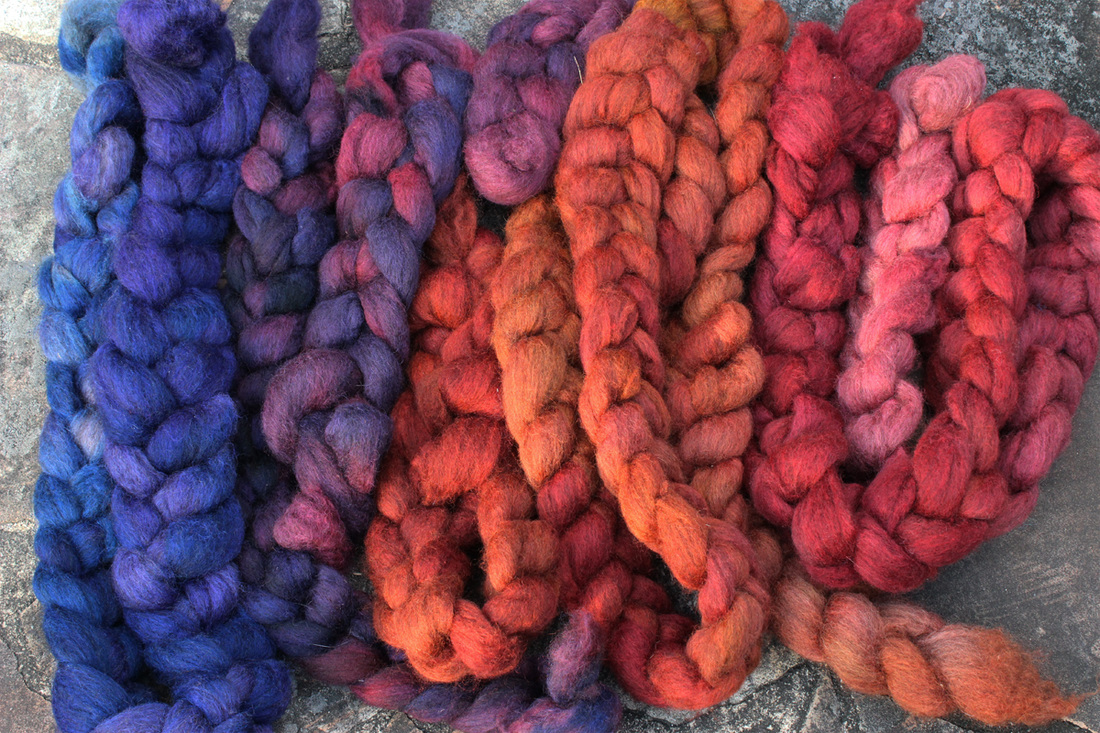
I've been dyeing combed wool top, and some of it started as a natural brown color. I had two pounds of this stuff, all bought so long ago that I don't remember the particulars on the fiber. Originally the wool was a pleasant light-medium brown color with some variation. The texture is reasonably soft, and the fiber length and crimp are in the medium range. I think I meant to spin the fiber just as it was and use it as brown yarn (such a yarn would look great in a cabled sweater). But recently I've seen combed tops for sale that are mixtures of white and brown fiber, and when they're overdyed, lots of complex shadings result. So I thought, why not overdye this brown top?
I tried out blue, violet, red, and yellow dyes in various combinations, all acid dyes. For dyeing wool top, I've been using the following method:
1) For about 4 to 6 ounces of wool top, put 4 to 6 inches of water in a designated metal pot (i.e. a pot you use only for dyeing, not for food).
2) Put the pot on a stove burner and turn it on. Add about a half to 3/4 of a teaspoon of dye to the pot (use a dedicated teaspoon). Be careful with the dry dye - it makes dust - don't breathe it. I was happy to observe that the Jacquard Acid Dye jars that I bought recently are processed to have a granular texture that is not very prone to make dust - thank you, Jacquard. I also like to use a dedicated pair of dishwashing gloves when handling dry dye.
3) Add a glug of white vinegar (one glug is approximately 1/4 cup). Stir.
4) As the water in the pot begins to warm up (touch the outer sides of the pot to feel), start feeding a continuous length of combed top into the pot. Move languidly, poking the top gently under the surface of the water with your teaspoon. Use dry, unsoaked top. Move slowly and do not agitate the top, because top will felt in a heartbeat and with very little stirring. If air bubbles cling to the top as you submerge it, press them out gently with the teaspoon.
5) As the water heats, the top will begin to take up the dye. You will see the murky colored dye water begin to thin and clear. If you have more top to dye, or if you want more variation in color, add more dye and more vinegar on top of what's in the pot. Be careful, stirring = felting. Top that is even slightly felted is very hard to draft in the spinning process.
6) You can add more water to the dyepot at this point if you are running out of room but want to dye several more ounces of top. Add warm water to a warm dye pot. Temperature change = felting. You can add more dye powder and vinegar later, too.
7) Continue to allow the dye pot to heat, but when any bubbles form, turn off the heat. Don't allow the dye pot to reach even the beginning stages of boiling. I've read that you can damage the wool fibers this way, but I haven't made that particular mistake yet (though I have learned the hard way how easily wool top will felt in a dye pot).
8) If the water is clear or nearly so, your top has taken up the dye, and it should be set. If the water is slightly colored, it would be smart to put the lid on the pot and let the wool steep in the dye water for awhile (half an hour to an hour), and then the water should be clear or almost so. If the dye water is not almost clear, then add more top until you get nearly clear water. The reason I do this is that I won't have to rinse excess dye out of the wool. Rinsing = felting, plus you're wasting dye. The excess dye could dye more wool for you, and then it wouldn't have to enter your sewer or septic system.
Most of the elements of the dyeing process I've outlined lead to a result that is not completely even and is not exactly repeatable. I wanted that effect. I also like that it's easy.
Now, when you have your top dyed and the dye water is nearly clear, here's the rest of the process:
9) Presumably you have a large pot of very warm to hot wool and water. Tip the pot into a sink to drain off the water (you might want to run a stream of cold water from the tap as you do so - it can help protect your plumbing from the sudden influx of hot water).
10) When the water is almost all drained, I tip the wool into the side of my sink that has a thingy over the drain so that the water can drain but the wool can't go down the pipe. This is hot wool. Don't run any water over it. Put your dedicated gloves back on and gently press more water out of the wool. Don't lift and squeeze. Gather the wool back into the pot.
11) On a sunny day in a place like Georgia, I can just take the pot of wool out to my back fence and drape it in loops to dry. Sometimes I need gloves for this if the wool is still hot.
12) When the loop of top are cool enough, you can gently squeeze some of the dripping water out of them to accelerate the drying process. Drying takes 2 to 3 hours, unless I have to dry indoors using a rack set up in a bathtub - then it takes 2 to 3 days. As the wool dries, it fluffs up naturally.
What I found was that the beginning brown tone allowed for rich-looking colors that have subtlety and a sense of layers. Compared to white top, brown top required a bit more dye to get deep color. Also, you can't make the top lighter, so yellow dye yields a yellow-brown rather than any kind of light, clear yellow like it could on white top. With the top in the photo, I wasn't in the mood for green on top of brown, but I'm guessing I could have gotten greens in the hunter range if I had wanted to.
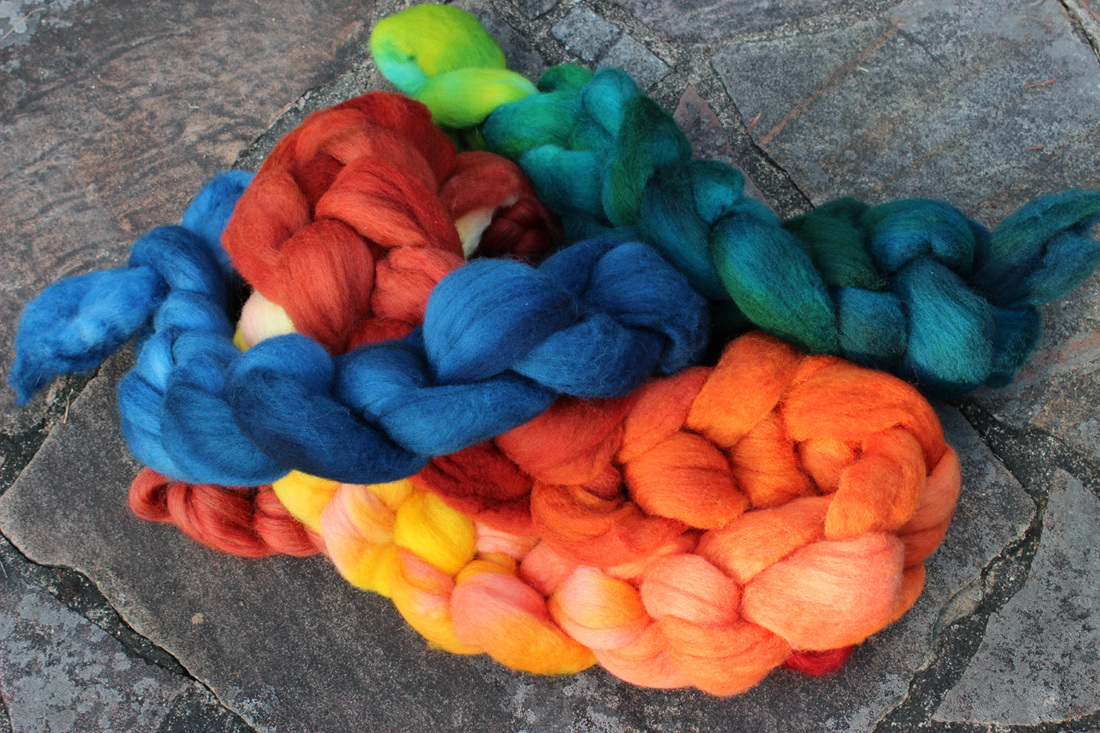
Below is a photo of white Falkland top that I dyed using the same dyepot method. You can see how the dye takes differently on a white wool. This is the same top I showed drying on the fence in the previous post.
 RSS Feed